With Easter coming up I needed a project...
And plastered all over Pinterest right now is the hot new way to dye Easter eggs using whipped cream. It's so simple, they all shout. That sounded like a challenge. I bet the kids and I could mess this up. So, we set out on a mission. An outdoors mission because, Mama doesn't want to clean up that mess.Here's what we gathered...
According to all the hip crafty moms, required supplies are minimal. A dozen eggs (yes, I'm aware two are missing in my dozen), some Cool Whip, and some dye. My husband threw in some bunny tongs hoping to minimize the mess. Wishful thinking, Dad. We didn't use the stinking tongs. That's what God gave us fingers for.
 After dotting the surface of the whipped cream with evenly spaced rows of food coloring (more like haphazardly, but details) we rolled the eggs along the surface of our concoction. It looked something like this...
Pretty cool, I'll give you that, Pinterest. The only problem was, it didn't take long for the kids to decide it was much more fun to play in the colorful fluff than to roll the eggs in it.
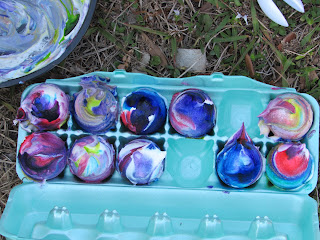
The end result was a little... uneven. Some of the eggs turned out fantastic. Colors
swirled and I was pretty impressed with us when we pulled these babies out of the water bucket...
Unfortunately, not all of the eggs turned out so well. Many of them were casualties of the Bernsen Art Destroyers.
The dye washed right off, leaving behind a faint pink residue.
We decided to try and save them, dipping them in coffee mugs of warm vinegar water with more dye, you know, like the cavemen did before the days of Pinterest.
We saved a couple, but two were too far gone.
Ultimately, I think I'll stick with the way my parents did it. It's less mess and more reliable. Plus, you don't have to worry about one of your sidekicks eating your supplies.


Comments
Post a Comment